Building HoloLens 2 QR Code Tracking App with MRTK3 and Unity
It’s been some time since I wrote a ‘how-to’ article. Recently, one of the interns on our team wanted to know how to use HoloLens 2 to track QR codes, so I thought of compiling a short article to share with everyone who wants this functionality in their mixed reality/augmented reality projects.
So let’s get started.

Prerequisites
- Unity 2022.3.XX LTS (I used Unity 2022.3.8f1 LTS)
- Your preferred C# IDE (VS 2022 or JetBrains Rider 2023)
- Mixed Reality Toolkit 3 (MRTK3)
- Microsoft HoloLens 2
- Mixed Reality Feature Tool (MRFL) — Download from here.
Start by creating a new project with Unity Hub using the 3D template. Then, set the platform to Universal Windows Platform by navigating to File -> Build Settings… Refer to Figure 2 below for guidance.

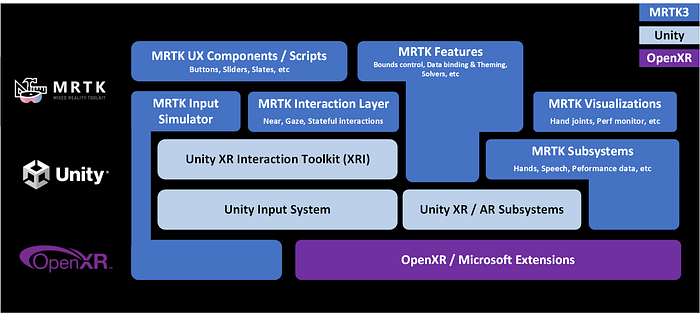
Alright, now that we have Unity ready, let’s proceed to install MRTK3. Note that MRTK3 has a new architecture compared to MRTK v2, which was a bit monolithic. MRTK3 is more modular (See Figure 3.2), allowing us to install only the features that are required for development independently and update them separately. Please refer to Figure 3.1 below for illustration of high-level MRTK3 architecture. For more details, visit the Microsoft documentation here. Keep in mind that the steps discussed in this article may not work with MRTK v2 due to these changes in architecture.


Now, close Unity and open the Mixed Reality Feature Tool (MRFL) and indicate the location of your Unity project. One thing to note is that when installing the required packages for MRTK3, I observed that attempting to select and install all of the required features together caused MRFL to crash. This might be a bug that could have been addressed in subsequent updates.
Under the “Discover Features” section in MRFL, expand the “MRTK3 (1 of 15)” collapsible list. Tick the following options: MRTK Graphics Tools, MRTK UX Components, and MRTK UX Core Scripts. Additionally, under “Platform Support (1 of 5)”, select the Mixed Reality OpenXR plugin (v1.10.0). See Figure 4 below.

Once you have selected these features, click on “Get Features” button (See Figure 4) and follow the GUI instructions to install them within your Unity Project. Upon reopening the Unity project, you may get several prompts, and it might ask you to restart Unity. If prompted, please proceed with the restart. Then, validate the Unity project to ensure that all the necessary configurations are correctly set, as shown in Figure 5 below.

Ensure to add Webcam capability to the Manifest. Navigate to Edit > Project Settings > Player window. Select the ‘Universal Windows Platform Settings’ tab (With Windows icon), expand the ‘Publishing Settings’ section, and locate Webcam the Capabilities list. Refer to Figure 6 below for guidance.

Done with the configurations. Now, I have created an empty object called QRCodeReading in the hierarchy and attached three scripts (components) to it. Two of them come with MRTK3, and one is a custom script. Look for the XROrigin and ARMarkerManager scripts, which come with the Mixed Reality OpenXR plugin package. To do this, go to the project window and use the search bar to type the script name, then change the search scope to “All” or “In Packages,” as shown in Figure 7.

Perform the same steps for the XROrigin script. Then, drag and drop both the XROrigin and ARMarkerManager scripts onto the QRCodeReading game object. Afterward, create a custom script — I named it TestQRCodeDetection (feel free to choose your own name). Refer to the TestQRCodeDetection code provided here. I have added comments in the code for clarity, so I won’t describe it here to keep this article concise and easy to follow. Add this script to the QRCodeReading game object as well.
Next, create another empty game object and name it QRCodeMarker. Again, search for the ARMarker script as described above (similar to how we looked for the ARMarkerManager and XROrigin scripts). Add the ARMarker script to the QRCodeMarker game object. Drag and drop it into the Project window to make it a Prefab. For best practices, it is advisable to create a Prefab folder inside the Assets folder and then drag the QRCodeMarker into that folder. Once you’ve done that, you can delete the QRCodeMarker from the Hierarchy window.
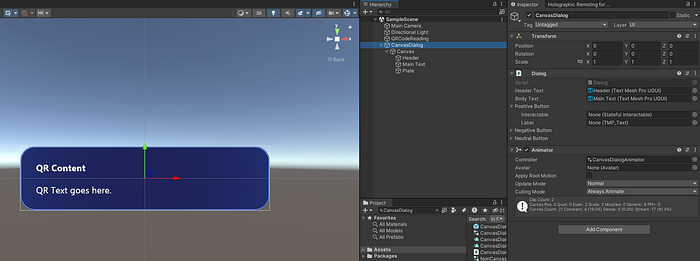
Finally, I added a CanvasDialog to display the contents of the QRCode (See Figure 8.1 and 8.2). This step is optional, as you may prefer not to visually show the QRCode contents and use other means, such as the Debug Log, to inspect the QR code contents.


Alright we are almost there. Few more things to do before we test. Drag and drop Main Camera gameobject to Camera feild in XROrigin, Add QRCodeReading gameobject to Origin Base GameObject field in XROrigin and Marker Manager field in TEstQRCodeDetection script. Then drag and drop the prefab we created above (named QRCodeMarker) to the Maker Prefab field in ARMarkerManager script and that’s it. In case I have missed something please see my configurations in the below screenshot.
Alright, we are almost there. A few more things to do before we test this HL2 app. Drag and drop the Main Camera game object to the ‘Camera’ field in XR Origin component. Add the QRCodeReading game object to the ‘Origin Base GameObject’ field in ‘XR Origin’ component and the ‘Marker Manager’ field in the ‘Test QR Code Detection’ component. Then, drag and drop the prefab we created earlier (named QRCodeMarker) to the ‘Marker Prefab’ field in the ‘AR Marker Manager’ component, and that’s it. In case I have missed something, please refer to my configurations in the screenshot in Figure 9 below.

Now we are ready to test this on HoloLens 2. The good news is that we don’t need to build the app to test this. With the Mixed Reality OpenXR Plugin v1.10.0, QR code detection works with Holographic Remoting as well. If you need a QR code to test, you can use the one provided below. Alternatively, you can use an online tool (e.g. qrcode-generator) to generate your own QR code.
If you want to try out the full project, you can find it on my GitHub.

As always, please let me know if I have missed anything, if the steps described are clear, or if I have over complicated something (i.e., if there is a simpler way to achieve this). I wish you the best of luck with your amazing mixed reality/augmented reality projects, and I hope this short guide proves helpful.
If you enjoyed this article and found it helpful, you can buy me a virtual coffee ☕️😊;

Cheers!
